|
|

Welcome To Power News !!
You're about to learn how to build a "2007
Superbike" ... using inexpensive porting technology,
even before
the manufacturers release it to the market !! Be sure to read the 17 past issues
at
the bottom of this article. They contain insights into
how engines actually work, and
intriguing
new ways to power up your bike without spending a lot of money.
Take a pit stop from the
"information super highway" and spend some time
reading these pages. Get ready to explore fascinating new engine technologies and
the ideas behind the power. I hope you find that you've gained some
valuable knowledge for your time
spent here on the pages of Mototune USA.
Power News is 100% free !! I only ask that you to help us promote the sport of
motorcycling !!
If you like Power News, please forward this page to all of your riding / racing friends
in your
e-mail address list !!
Thanks !!
~ MotoMan
|
|
|
|
The 2007 Superbike

In
1899, this statement was
released by the US patent office:
.
"Everything That Can Be Invented Already
Has Been"
.
Looking back over history, we laugh at many of the ridiculous ideas that were held as
'fact' by the 'scientific establishment' of the time.
At the same time, we are amazed to learn that the true innovators, the
free-thinkers & those who were
ahead of their time were
ridiculed or
even punished for their daring to challenge the status-quo ...
only to be found correct many years later.
Hindsight is 20/20 ... but the same "stuck in the
box" thinking of old is still here,
even in the 21st century. The
2002 version of this is: "there are so many
people who have thought
about this before me, all the good ideas are taken. "
Throughout civilization, people have always thought that their time was at the
peak of innovation and invention, only to have the next generation develop
newer, more innovative ideas.
The truth is that, even with all of our
advances, we "know" a lot of facts,
yet
actually understand only a little.
|
|
Six Ways To Think Out of the Box:
|
|
1) Don't Automatically
Believe Everything
You Read
2) Always "Explore The Opposite"
3) Never Fear Failure
4) When in Doubt, Go
For It !!
5) Never Put Limits On
Your
Imagination
6) Read Power News
 |
Thinking Out of The
Box
To Discover High Velocity Porting:
Don't Automatically Believe Everything
You Read
Many motorcycle tech articles say that big bore piston kits give more midrange
and less of an increase in top end power. The reason they give is that the
port's ability to breathe at high rpm's won't be matched to an increased
displacement's ability to suck in more air/fuel mixture.
That seems to
make perfect sense, except that it relies on the assumption that
the
ports are the correct size to begin with !!
When I first "over bored" an engine in
1990, I was surprised to learn that overbore pistons
actually make lots more
power at high rpm !!
This is a clue that the stock ports may not be small enough
to provide the port velocity needed for maximum power.
|
New Way To Use A Flowbench !!
A flowbench can be used to develop smaller, more
aerodynamic ports.
The experiment I recommend is
to apply modeling clay to the stock ports to test the effects of smaller port
volume on airflow.
By "exploring the opposite",
you can learn more about how to gain
something:
By first learning how to lose it !! |

A Superflow Flowbench
|
|
Using Clay For
Flowbench Testing
One of the problems with porting, is that by the time you find out you went
the wrong way, the cylinder head may be ruined ($$$).
By adding clay to the stock ports, you can "ruin" the flow without
actually ruining the ports. That's the best way to learn
where
the least "flow sensitive"
areas of the port are.
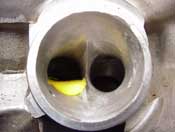
Here I've added clay to 1/2 the port, so it's easier to compare the size
difference of
high velocity porting.
If an area is unaffected by the clay, you should try adding more. Using this method,
an accurate "picture" of the flow characteristics of a port can be
visualized.
Doing something "wrong" is
sometimes the best way to figure out what's "right" !
|
|
|
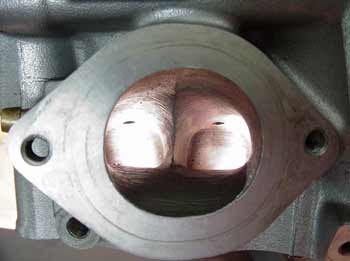
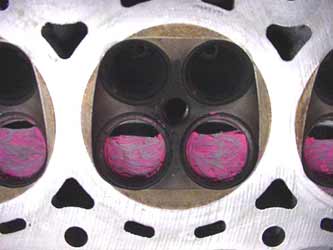
Always
"Explore The
Opposite"
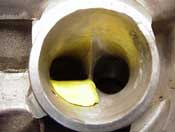
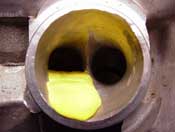
In this case, there was a huge surprise !!
The photo on the right shows how much clay can be added to both sides
of the port floor. The airflow, as measured on a flowbench
remains the same !!
How is this extra space in the port helping flow or horsepower ??? It isn't,
the area in the
port that is unaffected by the clay
is just dead
space.
The port's airflow is mostly
determined by the valve size. Extra space in the port only lowers the
velocity.
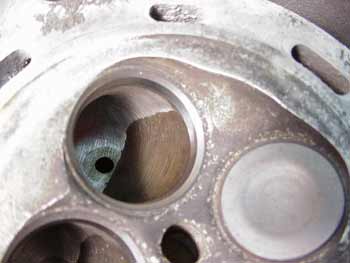
There's
lots
of unnecessary dead space
in the ports of most (1985-2002) multi intake
valve Japanese motorcycle engines !!
|
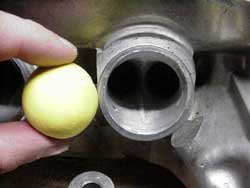
There's this much dead space in
a
Honda CBR 600 F3 intake port
If you own a flowbench:
It's tempting to want to
increase the port flow, but it's much more important to increase the
velocity !!
Most modern engines already have more than enough flow in the stock ports.
What they need is more velocity. I've intentionally made the ports so
small that they flowed 8% less than the stock ports. These high
velocity ports always make the best midrange and top-end
power !!
Do the "clay test" first
!!
|
Never Fear Failure
If a port can be made smaller without losing flow, then
it seems logical that there
should be a midrange gain, and you can consider that knowledge a win.
On the other hand, if the bike turns out to be slow, it could be embarrassing
!! But it wouldn't be failure, because it you'd learn a new way that didn't work, and
that knowledge is a win
as well !! Either way...
you win !!
|
Never Fear Failure
|
Never
think of "failure" as failure, only as a valuable guide that
re-directs
you in the right direction.
It's not easy to do, but when you decide
to truly apply this concept, you'll never lose !!
The only way people fail is when they're too afraid and don't do anything. |
When in Doubt, Go
For It !!
As it turned out, I got "lucky", because when I first tested this porting idea
in 1993 on a
Honda Hawk at Daytona, there was both midrange & top end power gain !! Every
multi intake
valve engine I've tried it on since then has had a similar power increase.
" Luck " really is just a matter of "Going
For It " enough times.
The Good News Is:
You Don't Need A Flowbench !!!
(I haven't used one in many years, and
have won hundreds of races using this simple formula.)
The
65% Port Reduction
Formula :
For best power, the choke point height should be 65%
of the diameter of the intake valve !!
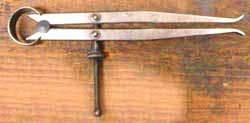
An inside caliper is used to measure the height of the tightest point in the
port.
This is called the choke point, and it's located between the floor
downturn,
and the roof of the port just before the valve guide.

|
The only area that gets enlarged:
In order to make room for the porting tool, the intake valve guides should
be ground down. This is the only area of the port that should be
enlarged.
Never grind down the exhaust valve guides. |
|
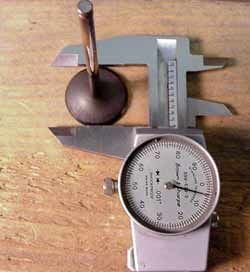
Measure the intake valve diameter.
This Honda F3 valve is 1.006 inches. |
|
|
|
Use an inside caliper to measure
the choke point... |
|
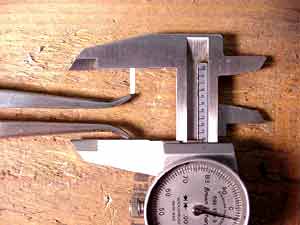
The outside caliper is set to the valve size 1.006 inches X .65 = .654
inches.
In this photo, the inside caliper is set to 65% of the valve, or .654 inches.
The white
line compares the 35% difference.
|
|
|

|
Here the caliper is at the choke point.
After the epoxy is in place it will be sanded down flat, until the
calipers can fit into the .654 inches choke point. Only the height is
decreased, while the width of the port is unaffected. |
Which engines does it work
on ??
These are the cylinder heads I've high velocity ported
to
65 percent of the diameter of the intake valve:
|
In each case ...
... the engine made an
all rpm power increase
of 6-8 percent !!
|
Yamaha
FZR 750 & 1000
FZR 400
FZR 600
R6, R1 & R7
YZF 600 (Thundercat)
|
Suzuki
GSXR 600 - 750
GSXR 1100
TL 1000 R&S
SV 650
|
|
Honda
Hawk NT 650
CBR 600 F2, F3, F4,F4I
CBR 900 - 929 etc...
|
Kawasaki
EX 500
ZX6,7,9,10,11
KLR 250-600
Vulcan 800
|
|
" Too Much Velocity ?? " |
|
Honda F3
In 1996 I built a Honda F3 for the new 102 hp class. The
rules allowed any engine modifications, as long as the bike didn't exceed 102 peak
hp. on the official race dyno.
The engine had Wiseco 2 mm overbore pistons
(636 cc's) and stock cams. Most F3's with this set up made around 99 - 100
hp with stock ports.
My customer wanted to be careful not to go over the
limit, and he set a goal of 98 hp. I made the ports much smaller than I
normally did, and when I flow tested them, they flowed 8 % less
than stock !!
It seemed logical that if the ports had "too much
velocity" the bike would gain midrange and lose 3-4 hp at high rpm.
Using calculations derived from flow testing, I predicted that the engine
should make 96 - 98 hp.
When we got down to the first 102 race at Daytona, I
broke the engine in with about 6 dyno runs. The piston rings were
definitely not 100% sealed, but the engine was ready for it's first full
power dyno run.
The midrange was awesome, and it made 103.8 peak HP ... nearly 6
horsepower more than my prediction !!
|
|
Does reduction porting
increase the port's turn radius,
to make the ports more "downdraft" ???
No
On the newer, more "downdraft" cylinder head
designs, this technique actually causes the port to become less downdraft.
The idea isn't to increase the port's turn radius or make it more
downdraft, or even to make the air "flow" more
easily.
It's all about making the port a lot smaller for higher flow
speed.
The ports that make the
most power actually lose some
"flow" as measured on a flowbench
!!
Remember: Velocity has a Greater Effect on Power than Flow does !!
|
Pushing The Limits 1 Step Further ....
Getting Down & Dirty !!
|
The KLX 250 ~ 365
"SuperDirtBike"
This motor had a 5mm larger bore, and a 9mm longer stroked crank,
which increased the single cylinder's capacity to 365 cc's !!
That would be like enlarging a 1000 to
a 1460 !!
With a huge 46 percent increase in capacity, you wouldn't think the
ports would benefit from being reduced. |
 |
|
One year before the motocross world
was waking up to the reality that the 4 stroke Yamaha YZF 400 could rival
2 strokes in all out power...
This KLX
project was already blowing away 2 stroke 250's !! |
 |
|
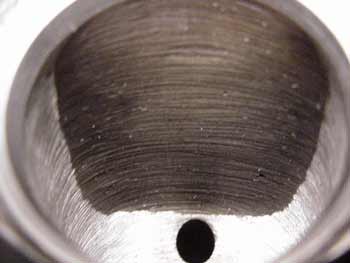
The Secret !!
Every possible area in the port was reduced, including the bowl area !!
By applying clay to the bowl area
during flow testing, I was able to find another area of "dead flow
space" in the KLX head. The epoxy really speeds up the intake charge
past the valve and into the huge 46 % bigger cylinder.
The extremely rough surface finish
helps
to keep the fuel and air mixed as it
enters the cylinder. |
 |
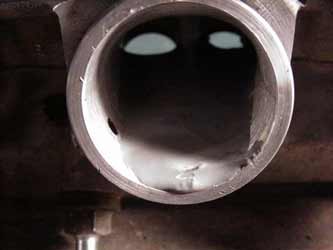
Finishing Your High Velocity Ports:
In the last issue we finished the port surface, and
roughed it up in
preparation for the epoxy. Next, modeling clay was used to keep the epoxy
from running out past the valve seats. Then the ports were filled about 40
%
with liquid epoxy. Let the epoxy set for at least 24 hours.
Now the clay's been removed and the epoxy is ready for finish porting:
|
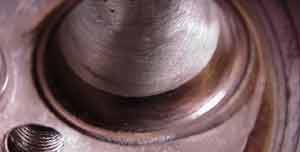
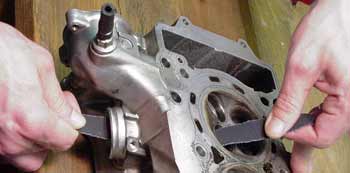
First, sand down any irregularities in the floor, and
set the 65% choke height. |
|
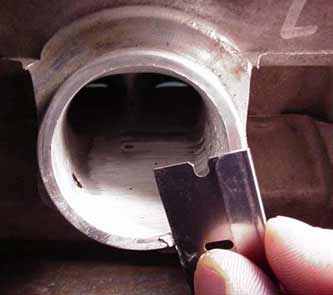
|
Don't sand on the sealing rim
of the port !!
Instead, use a razor to cut off any excess epoxy. |
|
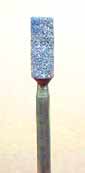
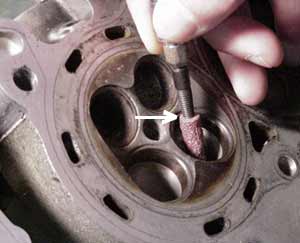
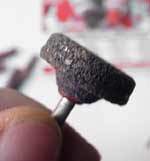
Use a thin grinding stone to get out most of the extra epoxy
from around the valve seat area....

60 Grit
(Coarse) Sanding Roll
...then use the 60 grit sanding roll to match the epoxy to
the narrowest point in the valve seat insert, and
to create a rough
port surface.
|
Be SUPER careful when you're removing
epoxy near the
valve seat area !! |
|
Avoid the sealing area of the valve
seat at all costs !! One nick with the porting tool will ruin the valve
seal.
Also, be extra careful not to touch
the lower valve seat angle. This port's flow has been ruined by another
tuner who eliminated most of the lower angle !
|
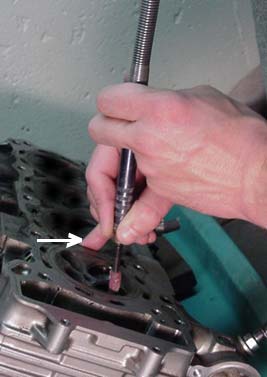 |
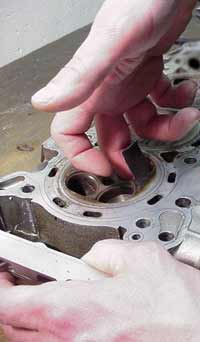
Get a Grip
I grip the porting tool with both hands, also notice how I anchor my
little finger to get maximum control of the tool.
Rotate the sanding roll in a circle to match the epoxy to the port throat.
Keep the porting tool moving at all times to avoid digging
into the epoxy.
As the aluminum and epoxy start to get matched up, put less pressure on
the (softer) epoxy so it doesn't "sand" faster than the
aluminum.
Ideally, you want the epoxy and the aluminum to blend
perfectly, there should be no steps or depressions in the epoxy.
|
 |
Caution:
When you're rounding the sharp angle from the floor to the valve seat,
watch out that the sanding roll doesn't hit the valve seat on
the other side !!
(It's easy to ruin a valve seat) |
|
Next, use a strip of coarse emery cloth to get the
radius almost perfect ... |
 |
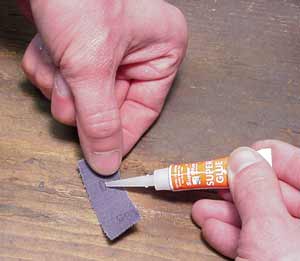 |
For the last step, use a drop of super glue on a piece
of emery cloth... |
|
... to keep the sandpaper from falling off your finger
!!
This will make the floor radius smooth, which is the most important area
in terms of flow.
The intake ports are done !! |
 |
Where To Get Porting
Bits:
|
Assorted Dremel Grinding Stones
Available At Most Hardware Stores
|
60 Grit
(Coarse)
Sanding Roll & Pilot
|
|
MSC
Industrial Supply
1 800 645-7270
60 Grit
(Coarse) Sanding Roll
Box of 100
Part Number: 09898701
Pilot
Part Number: 09900663
|
...and now to answer the question you may
be wondering:
Why don't the manufacturers know about smaller ports ???
|
MotoMan |
 |
"They Do."
!
!
!
!
!
!
!
!
! |

|
Think about your answer to that one !!
... and I'll explain my answer in the next issue of Power News,
which will be all about:
Exhaust Porting !!
Have a Cool Day !!
~MotoMan
|
2 Ways You Can Help Mototune USA !!
If You've Gotten

Forwarded To You By a Friend...
Please Sign Up To Get Future Issues !
|
Wow ...
There's 17 More

Back
Issues !!
Each Article Builds On The Last ...
So For Best Power Results, Please Read Them All:
Espanol:
Featured Site:
Hey ZX 12
Riders !!

Everything you ever needed to know on the Kawasaki Ninja ZX-12R sportbike.
Over 1.5GBytes of Movies, pics, maintenance, performance upgrades, dyno charts,
AND BIKE BABES !!!
Purchase a ZX-12R.org Sticker for your Bike and qualify for monthly prizes !!